Note from Webmaster: David's original article includes a number of pictures, some of which I haven't scanned in yet and some of which are potentially under copyright. Appendix B contains some formulae, which I haven't Webbed yet. These things will come in time....
Pavilions are great. Over the last decade in Atlantia we've gone from nylon tents to the point where many people have nice canvas pavilions. This is wonderful. However, I have never quite been satisfied with most commercial pavilion designs. For one thing, they are all designed for short people -- I cannot see outside from inside the tent.
Some time ago I observed that the most common pavilion in period manuscript illustrations was a round pavilion with a single center pole. Commercial designs for these pavilions aren't satisfactory. I started looking at medieval and Renaissance illustrations of simple round pavilions, and I made a couple of observations.
The second such illustration is even more evocative. It shows a military camp after a storm has blown through. Some of the pavilions have been knocked over. One in particular is partially on its side, but retains the conical shape of a single-pole pavilion. This is impossible with a perimeter pole construction, and is strong positive evidence for the spoked-wheel construction that I will describe later. Sadly, I've lost my copy of this illustration, so I couldn't include it with this handout. I'm still looking for it, though.
[Webmaster: Mary Hall sent me the URL of one such picture. Note that although the picture depicts an event of 1347, the ms. is 15th-century, and the tents and armor look 15th-century to me. The devil's advocate points out that the falling-down tent in the foreground could be artistic license, on the theory that nobody would recognize it as a tent if it looked like a real falling-down tent. However, the optimist points out the skill, relative realism, and beginning attempts at perspective in the rest of the picture, and thinks it unlikely that the artist who focussed the picture on the falling-down tent would have so little confidence in his ability to portray it recognizably.]
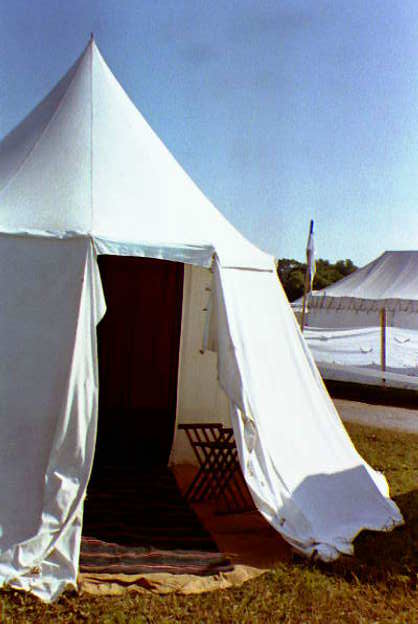
Based upon the evidence of manuscript illustrations and paintings, the most common period pavilion type is a center-pole pavilion, circular or polygonal, with splayed walls and no ropes. See figure 2 for a good example of this type of pavilion.
So the question then becomes, `How did the pavilion gain its shape?' Clearly some sort of internal structure is used. My first experiment was using an internal wooden hoop, bound into the eaves of the pavilion. This turned out to be awkward, ungainly, time-consuming, and unstable. It was hard to put up and involved a lot of awkward pieces. In any sort of wind it shifted around and distorted. It was impossible to tie down securely, as tightening the ropes distorted it still further, and eventually the hoop broke while being bent and warped by the wind.
So that experiment failed. On a large pavilion the hoop technique was inherently unstable and fragile. Very frustrating; I had the cloth for a fine pavilion, and no way to put it up.
At this point I saw a pavilion owned by Sir Xenophon and Mistress Celynen. Their pavilion was made by a company in England that supplies pavilions to a number of historical and re-enactment groups. As I understand it, the design is based upon a 15th century Burgundian pavilion in the Bern Museum in Switzerland. Their pavilion used a spoked-wheel construction, with the hub passing through the center pole and the spokes supporting the eaves. This system would explain the `pavilion after the storm' illustration in a way that perimeter poles or hoops could not.
So I built a spoked-wheel structure for my pavilion, and found that my awkward-duckling pavilion had turned into a swan.
The spokes are simple octagonal poles with a 1.5" cross section, slightly less than 6' long. One end has a 10' rope coming out of it. The rope fits through a grommet in the tent eave, then runs outside to a stake. The other end is tapered to a cylinder, so it will fit inside a hole in the hub.
A number of advantages quickly became evident after I modified my hoop tent into a spoked-wheel design. It is faster to put up or take down. Ropes aren't necessary. The tent is stable, and the roof stays taut in spite of weather. There is also more usable space inside.
The design also has a number of minor benefits. The Pavilion has a `loft'
available, created by the roof spokes. This can be very useful for hanging
wet clothing. The spokes can also be used to hang cloth dividers, allowing
a lot of freedom in subdividing the available space. Decorative tapestries,
painted wall hangings, banners, and fancy cloth walls can be used to make
internal rooms.
Plain, undecorated pavilions are shown in figures 2, 4, 9, 13, and 21. Some of these are in pictures with other decorated pavilions.
Simple designs, often no more than decorative lines on the seams, can be seen on the pavilions in figures 1, 4, 18, 23, and 25. These would be easy to paint on a pavilion in a few hours, for minimal cost.
One of the commoner decoration techniques for medieval pavilions is various types of gothic arches, painted on the walls of pavilions with associated designs on the roofs. Although more complicated than the simple linear decorations, these too are easy to paint on a pavilion with a little bit of preparation, even in a single afternoon. Examples of these decorations can be found in figures 6, 8, 10, 14, 17, 20, and 24.
Complex multi-colored patterns painted on white canvas are less common, but still occur. Figures 5 and 15 show two examples of such pavilions.
Broad stripes and bands of colour are also used. This decorative technique requires using coloured canvas, either buying it the appropriate colour or dying it yourself. An early (13th century) example can be seen in figure 14, a later (Tudor) one at the top of figure 26.
Some pavilions are shown in solid colours, often with painted decoration or accents. Examples are figures 3, 7, 11, 12, 19, 22, 25, 26, 27, 28, and 29. These are the richest looking pavilions, and are often used in illustrations to denote the pavilions of the wealthiest and most powerful nobles and kings. Some of the full-colour pavilions are shown with contrasting linings of decorative fabric.
Finally, many pavilions are marked with the arms of their owners. This is often combined with simple linear decoration or decorative arches. Examples can be found in figures 1, 4, 5, 8, 10, 18, 23, and 25.
I will describe dimensions for three separate designs: a small tent suitable for a dayshade, changing tent, or one or two people; a larger multipurpose pavilion; and a large pavilion suitable for use as a great hall at events, sleeping a whole household, and so on. All of the dimensions I describe are calculated based upon finding 60" wide canvas. The bottom edges of the wall trapezoids, on all three designs, are exactly 60" across. If your canvas has different dimensions you may need to redesign. For example, if you have 96" wide canvas, it is possible to construct an 8-spoke pavilion with 6' spokes.
The small tent uses 8 spokes 4' long. It is 11' tall, 13' diameter on the ground (134 square feet area), and requires 32 yards of canvas to construct. The cost of this tent in materials is less than $200, depending upon the price of canvas in your area.
The pavilion has 12 spokes 6' long. It is 13' tall, nearly 20' diameter on the ground (293 square feet area), and requires 54 yards of canvas to construct. This tent will cost around $300 in materials by my estimate.
The large pavilion has 16 spokes 10' long. It is 17' tall, more than 25' diameter on the ground (516 square feet area), and requires 88 yards of canvas to construct. This large pavilion will cost less than $500 in materials, depending upon the price of canvas.
 At right is a picture, contributed by Brian Wright, of the three sizes as
rendered by "3D Studio Max". The green rectangle represents a
6' tall (and rectangular) person.
At right is a picture, contributed by Brian Wright, of the three sizes as
rendered by "3D Studio Max". The green rectangle represents a
6' tall (and rectangular) person.
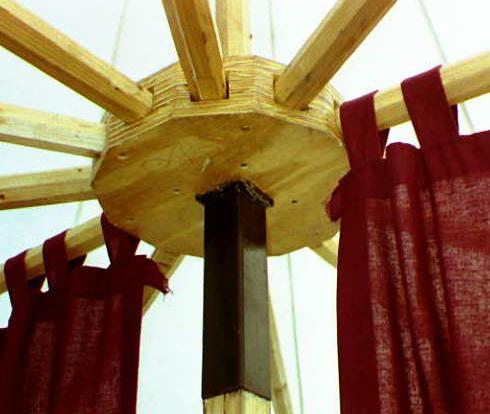
 The easiest way to make the hub is to laminate four pieces of 3/4"
plywood to make a slab 3" thick. Use good wood glue, and be sure to
use high-quality plywood. The more laminations (layers) in the plywood
the better. Once the glue has dried, cut it to shape (8 sided, 12 sided,
or 16 sided depending upon the size of pavilion) and drill one hole in
each side using a 1.5" spade bit. You only need to go about 2"
deep on each hole.
The easiest way to make the hub is to laminate four pieces of 3/4"
plywood to make a slab 3" thick. Use good wood glue, and be sure to
use high-quality plywood. The more laminations (layers) in the plywood
the better. Once the glue has dried, cut it to shape (8 sided, 12 sided,
or 16 sided depending upon the size of pavilion) and drill one hole in
each side using a 1.5" spade bit. You only need to go about 2"
deep on each hole. After the spoke holes are drilled, you need to make a hole through the center of the hub large enough to admit the center pole. The size and shape of this hole depend upon the dimensions of the center pole.
The dimensions of the hub are not crucial to the design of the pavilion. The important thing is that the hub is broad enough for the holes holding the ends of the spokes (8, 12, or 16 spokes in the three designs of pavilion I describe). In my pavilion the hub is 6" radius, and the holes for the twelve spokes are 2" deep. This means that the spokes should be 4" shorter than 6' (in other words, 5'8") so the distance from the center pole to the end of the spokes is exactly 6'.
 CENTER POLE:
 The center poles in manuscript illustrations and paintings vary from moderately slim to enormously huge (see figure 3). If you have a car with a roof rack that can take a long pole, you might want to have a pole without any joint. If not, the following joint system is easy and reliable.
My center pole started out as a 7' piece of 8/4 Oak, about 6" wide. I got my fancy woodworking store (where I found the wood) to plane it and cut it into two 7' long poles, 2" square, and some waste. The total cost to me was $25 or $30.
 I then bought a 16" section of 2" square metal pipe from a
metalworking store. I cut two ends of the 7' poles at a 60 degree (steep)
angle, then fitted one end tightly into the metal sleeve and the other
one slightly more loosely.
I then bought a 16" section of 2" square metal pipe from a
metalworking store. I cut two ends of the 7' poles at a 60 degree (steep)
angle, then fitted one end tightly into the metal sleeve and the other
one slightly more loosely.
Finally, I beveled the top section, rounded the top and drilled a hole into it, into which I glued a large metal spike. The result is a center pole that comes apart readily, and is quite sturdy.
Buy canvas that is pre-treated to be water-resistant and fire-retardant, if you can get it. Buy good canvas. This is not the place to cut corners of cost.
I STRONGLY advise that you not attempt to sew the pavilion without a very heavy-duty sewing machine. You can rent these in some places, or find a friend who has one if you are lucky. Some possibilities for renting or borrowing heavy-duty sewing machines are university theatre departments, theatrical supply stores, or commercial enterprises making or repairing sails or tents. Dont try to use an everyday utility sewing machine if you can avoid it. It will be very frustrating and take a long time, breaking a lot of needles. I'm speaking from experience, here.
 Get
some experienced sewing guru to advise you on any questions you have regarding
the sewing. One important thing to do is to get them to show you how to
make a flat-felled seam: all the seams on the pavilion should be flat-felled
seams for strength. Luckily for anyone who (like me) is a sewing ignoramus,
all the seams are straight and simple.
Get
some experienced sewing guru to advise you on any questions you have regarding
the sewing. One important thing to do is to get them to show you how to
make a flat-felled seam: all the seams on the pavilion should be flat-felled
seams for strength. Luckily for anyone who (like me) is a sewing ignoramus,
all the seams are straight and simple.
Cutting out the large canvas pieces can be a chore, especially marking the long straight lines. The easiest way to do this is to lay the fabric flat, then take a surveyors chalk-line and use that to mark the cutting line.
NOTE!!!! There are NO SEAM ALLOWANCES marked on the pattern. You MUST allow some appropriate seam allowance on the outside of each pie piece for the roof and of each trapezoid for the walls. I'm not exactly sure what seam allowance is best: I added a 1" seam allowance. If you forget to do this, you will waste an awful lot of fabric.
First, finish all the rain flaps on the edge of each roof pie piece. The rain flap is the 12" deep rectangle at the bottom of the pie piece. You can dag it if you wish, hem it or edge it with some contrasting coloured edging.
Now sew all the pie pieces for the roof together. At the peak you will need to sew a large metal ring or grommet to the pieces. Alternatively you can take a short section of 1/2" rope (something that will not rot: nylon or hemp, not cotton) and wrap the thin ends of the pie pieces around the rope before sewing them down. This will leave a hole at the very peak of the roof for the center pole to go through.
Finish the top edge of each wall trapezoid, and the mud flap at the bottom (the rectangle 5' long by 1' deep).
Now work your way around the tent, sewing one trapezoid on at a time. Note the dotted line on the pattern that marks the edge of the flap -- that is where the top of the wall must be sewn to the roof. Make sure that the roof rain flap is on the outside. Sew the seam attaching one trapezoid to the other along the side seam as well as the roof seam.
Before you go too far, decide how many doors you want and where. To make a door, just finish the adjacent vertical edges of two wall trapezoids rather than sewing them together. I've found it very convenient to have two doors on opposite sides of my pavilion. This allows me to open both doors and let a breeze through in hot weather, and it is often convenient to have a back door.
Once the walls and roof are sewn, you need to make small reinforced cups of some of the remaining scrap canvas. These cups are sewn to the edge of the eaves. Their function is simple--they lock one end of a spoke in the right position on the edge of the roof.
Take a square of canvas and fold to make a triangle. Sew it down and finish
the edges using any simple method (hem, serge, whatever). Fold again, to
make another triangle. Sew one edge so that you have a triangular cup shape,
with the hypotenuse open. This sounds complicated, although it is very
easy to do; I hope this illustration will help explain it.
[Webmaster: For a dissenting opinion on how to build these pockets, see Pavilions in Greydragon.]
 Now
sew the cup down (making sure not to close the cup) so the end of the pole
will fit inside the cup. Sew one such cup at every spoke position (where
the horizontal seam at the eaves crosses a vertical seam down a pie piece
and wall trapezoid).
Now
sew the cup down (making sure not to close the cup) so the end of the pole
will fit inside the cup. Sew one such cup at every spoke position (where
the horizontal seam at the eaves crosses a vertical seam down a pie piece
and wall trapezoid).
If you want to have ropes on the tent, sew simple loops to the outside of the eaves to take the ropes.
Stake loops are constructed by sewing heavy-duty woven cotton straps to the bottom of each vertical seam on the walls. Make sure you sew them down securely. You will need one loop for every vertical seam joining two wall trapezoids; doors will require one loop for each trapezoid edge at the door opening (two loops total).
For the pavilion shown in illustration 13, it is clear that the walls can be detached from the roof. I don't really recommend this for your first pavilion. Sewing the walls to the roof makes the whole thing more secure, less work to put up and take down, and so on. The pavilion will not be steady (or even stay up) if one of the walls is removed because the walls hold up the roof.
However, if you are making a very large pavilion, it makes more sense to have the walls be detachable so they can be transported separately. If you want to make a pavilion with detachable walls, I advise sewing toggles and loops every six inches across the dotted line marking the edge of the roof pie segments, and along the finished top edge of the wall trapezoids. You will need to be very careful and precise. Small errors in placement will cause gapping and other problems, letting wind and weather in at the roofline.
Some pavilions were plain undecorated canvas, but many of the ones shown in manuscript illustrations are brightly coloured or painted. I haven't experimented in dyeing canvas, so I can't give any useful advice for reproducing the beautiful full-colour pavilions that can sometimes be found in illustrations. Consult with some local fabric guru and experiment.
Painting a pavilion is quite simple. Most pavilions were painted with simple lines, gothic arches, and the like. This turns out to be quite easy to do. I bought commercial exterior acrylic latex house paint from a local do-it-yourself store. You need to thin the paint with water so that it soaks into the canvas a bit. This makes it much easier to brush on in a single application -- undiluted house paint tends to bead up on the surface. You must avoid diluting the paint too much, though, or it will wick out from the design rather than sticking to where you apply it. I found that thinning the paint with an equal amount of water gave me a good consistency. As an added benefit this also cuts the cost of the paint in half, as you get two gallons from every gallon you buy. Don't paint your pavilion indoors -- find a big slab of clean concrete or pavement to lay the pavilion out and paint it. The paint will bleed through the canvas slightly, so dont paint on a surface where this will matter. Be very careful to avoid spills onto the canvas, as they are impossible to clean up.
Most single-pole pavilions seem to have had a decorative finial, often a golden ball. Some pavilions have whole statues on top, as shown in figures 26 and 29. Flags are also fairly common, sometimes in conjunction with a gold ball. A decorative finial of some sort makes the pavilion look nicer, but it also has a practical purpose in plugging the only hole in the pavilion fabric, at the top. I've experimented with a number of simple ball designs but I haven't found one I'm really satisfied with yet.
Finally, the flap at the end of each roof segment is often decorated. They may be dagged or painted, sometimes with mottoes and sayings in contrasting colours to the tent.
 These patterns are based upon 60" wide canvas. The trapezoidal
wall pieces take up the full width of the canvas, so can only be laid out
in one direction. The most efficient way to lay out the triangular roof
pie pieces is shown below. It is possible to lay them out so as to use
less fabric, but not advisable, as it involves cutting along the bias of
the fabric. Cutting along the bias will allow stretching of the piece,
which will distort the pavilion in the long run.
These patterns are based upon 60" wide canvas. The trapezoidal
wall pieces take up the full width of the canvas, so can only be laid out
in one direction. The most efficient way to lay out the triangular roof
pie pieces is shown below. It is possible to lay them out so as to use
less fabric, but not advisable, as it involves cutting along the bias of
the fabric. Cutting along the bias will allow stretching of the piece,
which will distort the pavilion in the long run.
All the calculations involved in planning a pattern for a circular (actually, polygonal) pavilion are fairly basic trigonometry. Start by drawing a scale-drawing silhouette of the pavilion you want, with dimensions for the height of the eaves (the level of the spoked wheel), the height from the eaves to the peak of the roof, and the width (radius) at the eaves and at the ground. Decide how many spokes you want. The number of spokes you wish may be fixed for you by the width of the fabric you have -- it is not possible to make a 12-sided pavilion that is 10' radius at the base when you only have 48" wide canvas, for example.
S = number of spokes (segments) in the pavilion
E = radius at the eaves (where the roof meets the top of the wall, and where the hub sits)
G = radius at ground level
H = height at the eaves
L = height from the eaves to the loft.
So the total height of the pavilion is (H + L), and the angle Ø between any two spokes is 360/S degrees.
In addition, we will be calculating the values for the following:
Base = width of the base of the trapezoidal wall segments
Top = width of the top of the trapezoidal wall segments (also the width of the base of the roof triangles)
ApparentWall = apparent height of the wall trapezoid
ApparentRoof = apparent height of the roof triangle
TrueWall = true height of the wall trapezoid
TrueRoof = true height of the roof triangle.
The important formula here is that the opposite side of a segment or sector of a circle, C, can be determined from the radius of the circle R and the angle Ø as follows:
C = 2R sin(Ø/2)
So substitute G in for R above to calculate Base, and substitute E in for R above to calculate Top.
Base = 2 G sin(Ø/2)
Top = 2 E sin(Ø/2)
The rest is application of the Pythagorean theorem. The length of a wall segment in your diagram is the hypotenuse of a triangle with sides of length H and (G - E), so by Pythagorus:
ApparentWall = sqrt(H2 + (G-E)2)
Similarly, the length of a roof segment from the diagram is the hypotenuse of a triangle with sides of length L and E, so:
ApparentRoof = sqrt(L2 + E2)
Now as a slight complication, the apparent lengths of the wallpiece and roofpiece on your diagram are actually the length of the angled side of the trapezoid and the long side of the triangle, not the true length we are interested in: the length perpendicular to the base of the trapezoid and the roof triangle.
This necessitates one more set of calculations using the Pythagorean theorem.
TrueWall = sqrt(ApparentWall2 - ((Base-Top)/2)2)
= sqrt(H2 + (G-E)2 - ((Base-Top)/2)2)
TrueRoof = sqrt(ApparentRoof2 - (Top/2)2)
= sqrt(L2 + E2 - (Top/2)2)
Now all that remains is to add a 6" wide rain flap at the bottom of the roof piece, and a 12" wide mud flap at the base of the wall trapezoid.
I strongly recommend cutting a 1/12 scale model of your pavilion out of paper and taping it together before you cut any fabric. This is a good way to ensure that your pavilion will have the proportions you want, and check against any mathematics errors. You might also want to make a little 1/12 scale human figure to put beside it, so you get an idea of how big the pavilion will actually be. I didn't do this, and I was slightly shocked at how large my little day-shade pavilion ended up. It sure didn't look so big when I made the paper model.
Estimating how much canvas your pavilion will use is also fairly simple. The fabric must be at least Base in width. The walls will use a length of fabric equal to (TrueWall + 12") for each of the S segments. For the roof segments it is usually possible to cut two segments from a width of fabric as described elsewhere in this article, so you will need (S/2) pieces that are (TrueRoof + 6") long each.
For example, my estimates for my pavilion (12 segments) were that each wall segment needed slightly less than three yards (36 yards total), and I could fit two roof segments in three yards (18 yards total), for a grand total of 54 yards of fabric.
I'd like to thank Branwynn Ottersby, my squire and partner in chaos. She and I did all the sewing on the original single-pole pavilion, attempting with our blood and curses to prove that two people who had no skill at all with sewing could still make a pavilion. She also graciously consented to proofread this article. Id also like to thank Sorcha de Glies, who tested the improved design described in this article, and proved with her blood and curses that having someone who actually can sew improves the whole product.
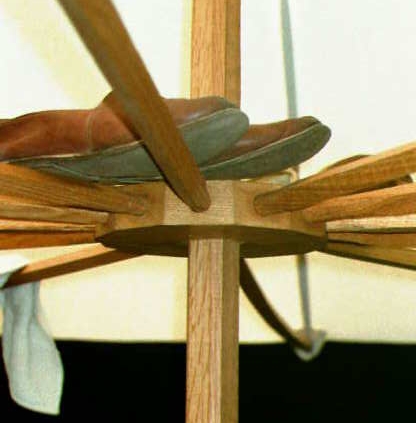
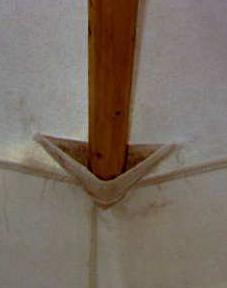
 In at least one of David's several tents built on this design, an "inner
roof" of light, breathable (and decorated) fabric has been added,
leaving a space between it and the real, more-or-less-waterproof roof.
The photo at right shows how this inner roof is attached, while the next
photo shows the appearance of the inside of the tent.
In at least one of David's several tents built on this design, an "inner
roof" of light, breathable (and decorated) fabric has been added,
leaving a space between it and the real, more-or-less-waterproof roof.
The photo at right shows how this inner roof is attached, while the next
photo shows the appearance of the inside of the tent.
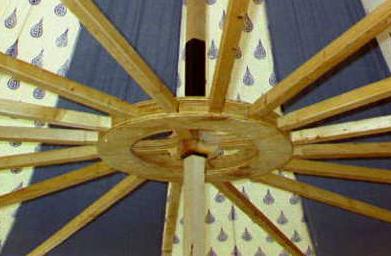
All photographs on this page are by Diane Cormier, who took them on the 1999 Pennsic Pavilion Class Field Trip.
![]()